Allium Alert!

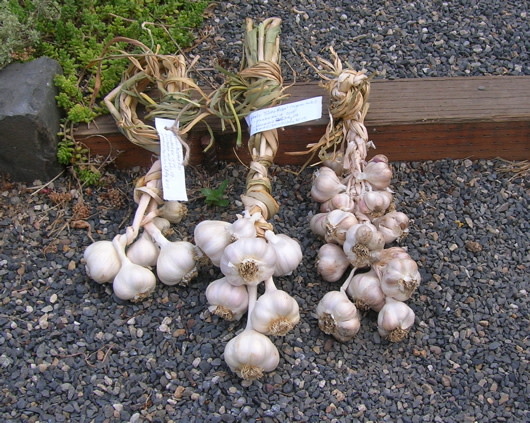
Cured garlic braids. Next year, I’m having my expert garlic-braiding friend teach me exactly how to do it so it looks pretty, with dried flowers woven in to it.
Garlic is an essential ingredient in the kitchen and one that is easy to grow in our region. Garlic (the plant) just needs a sunny spot in the garden; rich, well-drained soil; and moderate supplemental water. And from now through early December or so is the ideal time to plant. It is usually harvested around mid-July (depending on the weather).
There are two basic groups of garlic: soft neck and hard neck. Soft neck garlic stores well, is easy to grow and can be braided. Hard neck garlic has larger, hotter-tasting cloves, are easier to peel, and produces buds in June that can be harvested as "garlic tops" and sauteed.
NB: I’m a huge fan of the varieties ‘Silver Rose’ and ‘Nootka Rose’ – both soft neck types that take well to braiding and have a lovely silvery-purple sheen. But everyone has their favorites. Try a few varieties and you’ll soon discover your own.
Garlic cloves can be readily found at local nurseries right now – I saw some at both the Portland Nursery and at Dennis’ Seven Dees in the past few days. They can also usually be ordered from the fabulous Hood River Garlic website. Right now, they’re mostly sold out of seed garlic for the season but they are great folks and have a wonderfully informative and inspiring website.
I always choose organic cloves to start with. In my experience, one fat head of garlic (breaking into about 20 cloves, each of which grow into a new head) is good for about a year’s worth of moderate cooking per person in the household.
Dig up your garden soil about 1.5’ deep with a shovel so you are assured that it is is not compacted. If you haven’t added fresh compost or other organic matter to your soil lately, now’s the time – buy a couple of bags of compost suitable for a vegetable garden (try a bale of Black Forest soil amendment, or Whitney Farms Planting Compost to lighten up the soil if it’s heavy clay). The quality of your soil is so important – don’t skimp on compost. It’s the best money you can spend in your garden – better than plants, better than fancy tools. It’s the foundation for all healthy plants and is especially important when you’re growing vegetables.
If your soil is well dug, drains well, and compost has been added lately, then you’re ready to plant:
Take your head of garlic and separate the cloves (don’t peel them) just prior to planting. Plant each clove about 2" deep with the pointed tip facing up. (You can see little dried white roots on the bottom.) If you’re planting in rows, space the rows 12" apart and plant the cloves (or "seed" garlic) about 6" apart. Gently pat the soil on top to create good soil-clove contact. Then water it in. That’s it!
Looking ahead over the garlic clove’s development, here’s what to do and what to expect:
-Keep the area weed-free so that the weeds aren’t competing with the garlic or shading the little spear-like leaves.
-Scratch some organic fertilizer down the rows or on the area in about March: cotton seed meal, blood meal or any other nitrogenous amendment is good.
-Once summer arrives around June, the garlic will cease producing new foliage and start forming bulbs. At this point, hard neck garlic produces "garlic tops," which you can – and should – cut off and cook. Stop fertilizing and cut back on watering.
-About a week prior to harvest (early July), stop watering. If possible, let the garlic bed dry out to "cure" the bulbs in the ground.
-By mid-July, look at the leaves: when there are just 5 or 6 green leaves left on the plants, you can gently dig one up and see if the heads are fat and plump. If they look ready, gently harvest the rest of the bulbs with a fork. They can now be cured, braided (if soft neck), and stored for use.


