Small World
Summer 1900: Fifty million people swarmed Paris for the World’s Fair Exposition. Themed “A Century in Retrospect,” the fair covered architecture, technology, science, and art. Visitors rode the first escalator, admired Rodin sculptures, and were wowed by a demonstration of newfangled wireless telegraphy. Masses of impressionable Europeans and Americans also discovered, for the first time, the ancient Eastern art of dwarfing trees, called bonsai. The art form was imported from Japan, a country that had been closed to foreign visitors from 1635 until the mid-19th century. After hundreds of years of global isolation, everything Asian evoked curiosity. After the fair, the exquisite, diminutive bonsai became all the rage in New York City.
Meaning “shallow tray plant” in Japanese, bonsai are intentionally stunted trees that, in nature, grow hundreds of times larger than their miniature container replicas. Because of their beauty, small size, and relative ease of upkeep, bonsai maintained their popularity outside of Asia. The art garnered even more attention after World War II, when soldiers returned home from Japan with their prized bonsai in tow.
“Now, Portland has some of the finest bonsai in the United States,” says Lee Cheatle, past vice president of the Bonsai Society of Portland. “This area has excellent growing conditions, including ample sunshine and ideal temperatures during the long growing season, from April through October.”
If you’d like to try your hand at this ancient art, here’s a primer on how to choose, train, and grow your own bonsai.
{page break}
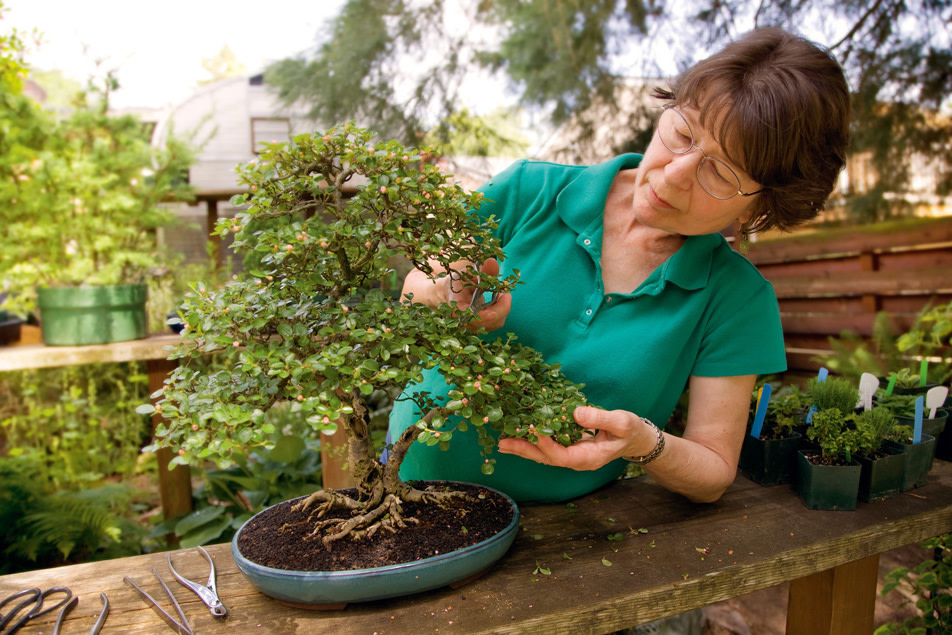
Selecting a Specimen
Traditional Japanese bonsai are often varieties of pine, spruce, and juniper, but most types of woody trees and shrubs are adaptable to the process as well. Suitable plants can often be found in a standard nursery; sometimes, they are already growing in your yard. Look for a young, vigorous specimen with small, dense, richly hued foliage and an interesting feature such as a gnarled trunk or a misshapen branch. (It is said that the more twisted the trunk and roots, the more stories the plant will tell.) Look at the plant from all angles, opting for those with graceful, well-balanced branches. The trunk should taper gradually toward the top, and the lowest branches should begin about one-third of the way up the trunk and should be the thickest.
Bonsai artist Peter Adams of Sequim, Washington, advises beginners to start with juniper trees, as they are inexpensive, hardy, and the most straightforward variety to grow and care for. Referred to as the “modeling clay of bonsai,” Shimpaku (Juniperis chinensis) can be easily trained to hold a shape.
Also consider whether you want to keep the finished piece inside or out. In general, indoor bonsai (categorized as tropical plants) experience no dormancy period and stay fully leaved all year. They may be kept outdoors on warm summer days but must be brought indoors and placed in natural light—but not in bright, direct sun—during the colder months. Some of the most popular indoor varieties of bonsai are weeping fig (Ficus benjamina), willow leaf fig (Ficus salicifolia), pomegranate (Punica granatum), Chinese elm (Ulmus parvifolia), jade plant (Crassula ovat), and banyan fig (Ficus benghalensis).
Most bonsai, however, are hardy species meant to be displayed in outdoor gardens. They will live outdoors year-round, requiring protection only in subfreezing temperatures and high winds. Popular hardy varieties include Japanese cedar (Cryptomeria Japonica), cotoneaster (Cotoneaster), maple (Acer palmatum & A. buergerianum), pine (Pinus), yew (Taxus), larch (Larix), and dwarf Alberta spruce (Picea glauca “conica”).
“One of the biggest mistakes beginners make is keeping outdoor plants indoors,” Cheatle explains. “Many trees, such as larch, maples, pines, and junipers, require dormant periods and must be kept outside. You can bring them indoors for a short time for display—a week at most.”
If you don’t want to start from scratch, consider purchasing “pre-bonsai” plants. These are specimens that have been pruned at least once, giving you an idea of the shape the plant will take over time.
{page break}
Choosing a Container
Your planting should be balanced and proportionate to its container in order to create visual harmony. Use the following standards as a starting place; then experiment to create a bonsai that is uniquely yours.
Although pot size is determined by the tree’s height, branch spread, and trunk diameter, most bonsai pots are very shallow. A bonsai pot should have a length slightly more than two-thirds its height, and a depth about equal to the diameter of the plant’s trunk at its base.
Once you’ve determined size, choose a container that reflects your desired aesthetic. Stoneware is ideal, since it’s usually unglazed and available in muted shades, which enhance the color of the bonsai’s foliage without detracting from the creation as a whole. For outdoor plants, steer clear of terracotta, which is prone to freezing and will crack easily.
"A bonsai can never be a finished work of art because it will always be a living piece of nature." —John Yoshio Naka, Bonsai Master
Planting
First, place a fine screen over the holes in the bottom of the container and lay a thin layer of gravel on top of the screen to promote drainage. Next, add a layer of soil—don’t use standard commercial potting soil, as it holds too much moisture and lacks adequate air pockets.
Soil for bonsai must retain some moisture, but should drain well and hold air between the soil particles for roots to grow into. Experienced growers use an inorganic blend of equal parts pumice, lava cinder, and akadama, an ingredient imported from Japan. A four-gallon bag of this mixture retails for approximately $19, and is available along with other soils suitable for bonsai at Wee Tree Farm and other bonsai specialty nurseries (see Info & Supplies on page 2).
Once your pot is ready, place the tree slightly off center and toward the rear of the container, placing the densest foliage toward the back to give the planting more depth. Twisted roots add visual interest and the appearance of age to the bonsai, so keep them exposed just above the soil level.
Bonsai trees need to be repotted when the roots fill the container. Growth will slow as the plant matures, and it will need to be repotted less frequently. Apply fertilizer to keep your bonsai healthy and strengthen roots without encouraging top growth. Use a diluted liquid fertilizer weekly during the vigorous growing season (April to October) and monthly when dormant. Keep in mind that it is better to fertilize too little than too much.
{page break}
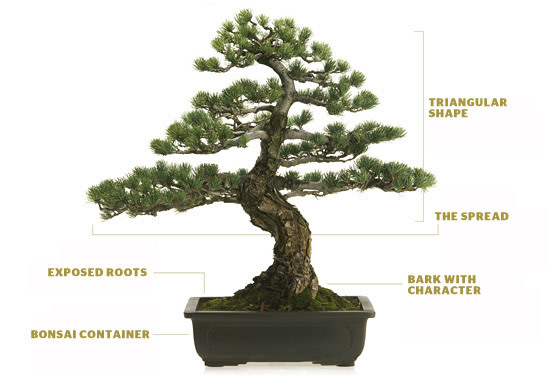
Anatomy of a Bonsai
Pruning
Bonsai is an art requiring patience, especially when pruning, which is a skill acquired with practice over time.
The intent of pruning is to capture and accentuate the beauty of the trunk and spread of the branches. Using a pair of sharp scissors or pruning shears, remove defective branches and dead twigs to create what looks like a miniature, ancient tree. Carefully snip off leaves that seem oversized or out of place; aim for a triangular shape, with the lower branches wider than the upper; and create an aged look by carefully removing small sections of bark with a sharp knife to make the plant look as if it has been ravaged by years of wind and rainstorms.
Branches should be asymmetrical, so prune to eliminate those that are exactly opposite each other as well as excess foliage that obscures the trunk. To avoid pruning mistakes, place a sheet of paper in front of a branch before removing it to see what the tree would look like minus the branch.
{page break}
Wiring
The real beauty of bonsai lies in the appearance of age, which is often accomplished by wiring—the most critical element in creating bonsai. Normally done during the dormant cycle in winter, branches are wound with copper or aluminum wire to give the illusion of weight and maturity and to redefine branch angles.
It takes varying amounts of time for branches of different specimens to “set,” or stay in the direction they are wired. Softer woods will set in the wired shape in four to six weeks, but it may take a year before the branches of some species will remain weighted down, or twisted, when the wires are removed.
First, select a branch that you want to alter. Gently wind a strand of wire around the length of the branch, making the turns about a quarter of an inch apart; use heavier-gauge wires for larger branches. Don’t wind the wire too tight; there should be just enough space for a sheet of paper to fit between the wire and the branch.
Wiring is done directionally: Twist the branch gently in the desired direction as you wrap the wire around it in the same direction. As the tree grows, the wires can cut into the bark, so loosen and rewire them, or remove wires as the branches grow and harden into the desired shape.
Remember to experiment. Bonsai is not a science; it is an art. And, as with all art, what one creates may never attain show quality, but with practice and patience, your bonsai will bring you joy—in the process of creating it and in displaying it.