Reaching Higher Ground
For some plants, survival of the fittest has meant learning to climb. Many use their strong tendrils like rock climbers grasping handholds. Others sprout clinging roots or twining stems to spiral up the nearest vertical. The trusty white trellis on the wall is one way to offer a hand. But you can also scrap the traditional methods and go freestyle.
Smart Design
Start with the simplest, strongest shape: a triangle. Three-dimensional garden tripods can be made from bamboo, driftwood or salvaged lumber. When fastened teepee-style with twine or other simple materials, the basic shape provides some height while creating the option for horizontal rungs, which sustain smaller, more delicate plants.
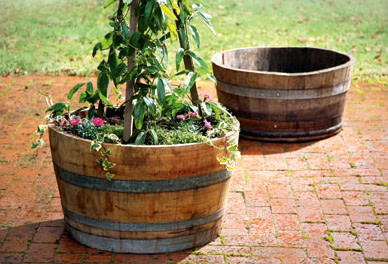
For the base, use a halved wine barrel. Although this somewhat ubiquitous vessel can look uninspired—for instance, pansy-packed sidewalk planters—adding an internal trellis will help the container come to life with color, texture and, of course, height. And because of their weight, wine barrels can support a tall trellis without tipping over.
{page break}
Barrel Tested
Wineries discard barrels according to season, so score yours as soon as possible. Any barrel seller will tell you that availability varies from year to year, so it’s first come, first served.
Try some of our larger wineries, such as Willamette Valley Vineyards (8800 Enchanted Way SE, Turner, willamettevalleyvineyards.com), which sells either full or half barrels for $20 to $35 during the spring and fall. Or visit Mr Plywood (7609 SE Stark St, mrplywoodinc.com ; $20 half, $49 whole) or Portland Nursery (multiple locations, portlandnursery.com ; $39 half), which acquire barrels from local vineyards when possible. Keep in mind that a barrel will range from 34 to 38 inches in height and 29 to 34 inches in width, and that it can weigh more than 100 pounds—so consider recruiting a strong friend for the pickup.
Make the Cut
If you’re starting with a whole barrel, cut it in half to create your base. Draw a straight line around the barrel bisecting the bunghole (the hole where wine is drawn from the barrel), which will prevent a crooked edge. Starting at the hole, bisect the barrel using a portable circular saw. Don’t worry if the metal bands around the outside of the barrel are loose or if some pieces of the wood lean into the center when you set the barrel on its end—the soil you’ll add for the plants will hold them in position.
Free Flow
While barrels make good bases, they were designed to hold liquid, not let it drain. Drill five one-inch holes in the barrel’s lid, which will become the bottom of the planter, so water will drain and keep what you grow from becoming waterlogged. Many barrels have a lip that raises the surface off the ground when it sits on its end, but if not, rest the final product on two-by-fours to create more drainage space. Move the barrel to its desired location. Choose wisely—once you add the soil, you’re not going to want to move it much.
{page break}
Triangulate
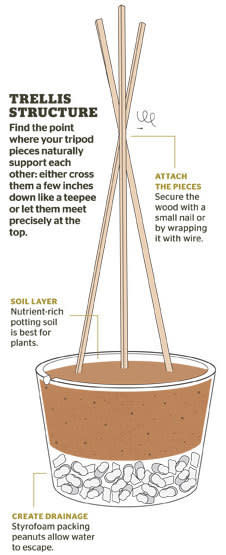
To build the tripod, you’ll need three pieces of wood measuring six to seven feet long. One foot of each leg will be buried in soil inside the base, so choose the length of your wood with your final desired height in mind. The width of the tripod pieces, however, doesn’t matter as much, says Greg Hulbert of Portland Nursery. “Plants are opportunistic,” he says. “They’re going to make do with what’s there.”
Try to find wood that’s interesting to look at, such as used lumber, old molding (both common finds at The ReBuilding Center, 3625 N Mississippi Ave, rebuildingcenter.org) or sturdy fallen tree branches or driftwood. (We cut old lumber into two-inch-wide pieces for this version.)
Once you’ve picked your tripod pieces, place them inside the barrel at equal distances along the inside edge. Bring the three pieces together at the top, finding the point at which they naturally support each other. This will probably mean letting the three points meet precisely, or crossing them a few inches down, creating a teepee look. Tap a small nail into the point where the three pieces meet, or wrap them with thin wire until the structure feels sturdy. Don’t worry too much if the pieces move a bit—the tripod will be secured firmly with soil.
{page break}
Plant Plans
Fill the bottom two inches of the barrel with Styrofoam packing peanuts (a good way to reuse them), which will help with drainage and make the planter a bit lighter should you ever decide to move it.
Add about two cubic feet of potting soil (not regular garden soil) on top of the peanuts. Potting soil contains pumice and other materials that encourage water drainage.
Although most plants will climb any type of structure, Hulbert warns that some plants, namely sweet peas, need a more delicate frame to climb. For these plants, run thin wire or cotton twine around the outside of the tripod at even intervals to form ladderlike rungs. Secure each rung by wrapping the twine around each tripod leg or by attaching the twine to each leg with a small nail.
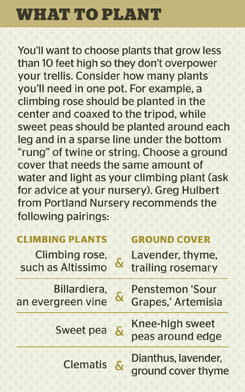
Settle your climbing plants in the container first (see "What to Plant" right), followed by ground cover that will spill over the edges of the barrel. Then watch your barrel become a blooming, eye-catching addition to your garden or patio with nary a lattice in sight.