Leafy Aspirations
In recent years, salad greens have enjoyed a culinary renaissance fueled by the American fascination with local and artisan foods—and a spate of books on the health benefits of French eating habits. At fine restaurants, the standard house salad, with chunks of cucumber, tomato and a choice of five fatty bottled dressings, has all but disappeared, replaced by tender heirloom greens, mesclun greens, baby greens and even microgreens, freshly picked and dressed with the lightest touch of vinaigrette.
These fashionable young greens are the same crops as the adult versions, just harvested at an earlier stage. They are simple to grow and make an easy transition from garden plot to plate. Most leafy greens bolt and turn bitter in hot, dry weather. Thus, early spring is the perfect time to sow: These greens grow more quickly and taste sweetest when daytime temperatures range from 60 to 70 degrees.
Find Your Plot
To grow your baby greens, find a patch of ground that gets plenty of sunshine in spring (a minimum of four to six hours of midday sun is best) and has good drainage. If you have an existing garden bed but the soil is tired or poor, spread 6 to 12 inches of compost onto the surface and work it into the soil. Mushroom compost and composted manures are best, but kitchen-waste compost and broken-down leaf mold are also excellent.
Be especially careful when digging wet soil. Stand on a board to minimize compaction and gently chunk the garden bed, pouring compost into cracks and then leveling the top with a hoe. You can blend it better when the soil dries out a bit later in spring. Note: If you are starting from scratch, you’ll need to prep your soil. (Check out the Down to Earth article for details.)
{page break}
See slideshow for more detailed information.
Choose Your Blend
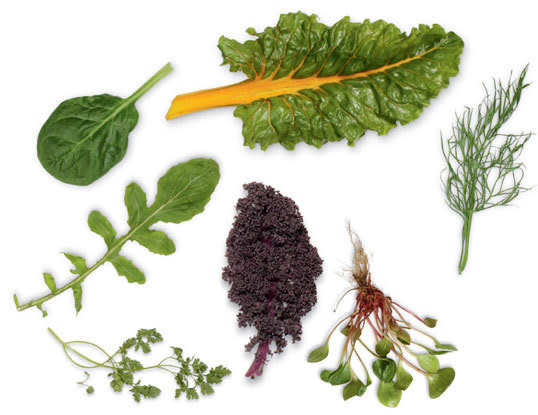
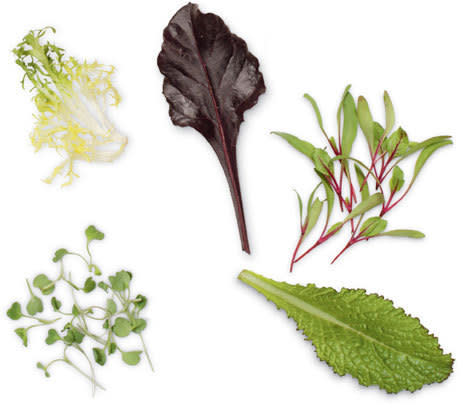
To create a blend of salad greens to suit your personal taste, peruse seed catalogs that sell a range of greens that adapt well to the Pacific Northwest climate. You want to pick greens with a diversity of colors, textures and flavors. For instance, select some cold-hardy lettuces (try at least one red and one green variety), then add a cold-hardy spinach or a good early beet green. You’ll want a sweet, buttery, dark green mâche as well as a bitter, hot or peppery green or two, such as frisée, mustard or arugula, to add contrast. Incorporating herbs like chervil, dill or parsley will also add a palate-cleansing, tonic quality to your salads. If you’re adventurous, consider unusual greens such as the succulent, slightly sour purslane, which is high in vitamins and omega-3 fatty acids, or miner’s lettuce (Claytonia perfoliata), an extremely cold-hardy native annual that was eaten by early miners and settlers and is high in vitamin C.
Sow Your Seeds
Get a jump on your first harvest of the season by starting in March. Invest in a soil thermometer ($9.99 at Portland Nursery, multiple locations, portlandnursery.com) so you can tell when the soil has reached 40 to 45 degrees. At this point, direct-sow the most cold-hardy greens like frisée (curly chicory), mâche, arugula, salad mustards and the more cold-hardy lettuces. As the soil warms a bit more in April (to around 50 degrees), plant chard, beet and spinach greens as well. Or try a premixed seed blend composed of cold-hardy winter and spring greens.
Sow your greens in mixtures or by separating individual types. Mixtures mature at different rates, but you can pick plants from the row as needed or just harvest everything at once, no matter its size. Depending on your layout, sow either in blocks or rows about three to six inches apart. I love the tidy look of close-set rows of greens, with varied jewel-toned colors and contrasting textures. Keep in mind that you need to be able to reach all the plants with your garden scissors or hands (if plucking individual leaves).
For continuous harvest, sow seeds for salad mixes every 7 to 21 days from March or April to September. (For June to August sowings, select heat-tolerant varieties to minimize bolting, particularly if you are allowing some of your greens to mature before harvesting.)
Protecting the Patch
The most challenging aspect of growing delicate greens during the wet season is keeping slugs at bay. Try using organic diatomaceous earth or organic slug bait like Sluggo or Worry Free Slug & Snail Bait. Rid your garden of pieces of wood, rocks and pots sitting on the soil near your vegetable bed, as they provide refuge for slugs. You can also simply plant more greens than you need so that you can afford to share.
{page break}
See slideshow for more detailed information.
Harvest the Greens
Harvest size is up to you: Snip the leaves at the microgreens stage (one to two inches tall, usually 14 to 21 days from sowing) or let them bulk up a bit for a baby greens salad (two to six inches tall, 21 to 42 days from sowing). These numbers are only estimates, though, given that there appear to be no industry rules regarding leaf size. Different types of greens grow at different rates, and soil and air temperature can affect the plants’ speed of growth appreciably. Begin with an experimental frame of mind and you won’t be disappointed.
There are two main techniques for harvest: Pick individual leaves as needed, or use the traditional cut-and-come-again method, in which you hold the plant tops with one hand while snipping the baby leaves off one or two inches from the base (have a bowl handy). If using this method, either turn the plants under after harvest and start anew, or lightly fertilize the plants with a fast-acting, organic nitrogen fertilizer and allow them to resprout once, or perhaps twice, more. Keep in mind, the cut-and-come-again method works only on plants that have established root systems and a crown. Spindly seedlings will not survive this technique; microgreens are a one-shot affair.
Planted in blocks, mixed baby greens generally yield approximately one pound per five to eight square feet of garden, depending on their size at harvest. And as with any produce, they taste best and contain the most nutrients when freshly picked.
Handling the Bounty
Handle your baby greens delicately; they bruise easily. Wash them by swishing the leaves briefly in cool or cold water. If you don’t have a salad spinner, try using a clean, zippered lingerie bag (used exclusively for salad-drying). Step outside and swing the greens around to eliminate all moisture. Washed, dried and cooled, baby greens will keep for five to seven days in the refrigerator. When properly grown and cared for, these tiny leaves will provide you with the most tender and nutritious salad available—homegrown greens at their best.