Fresh Starts
There are few satisfactions to match that of starting your own vegetables from seed. Part craft, part science, the process awakens nurturing instincts in even the most hardened urban dwellers. Sowing seeds connects you to the very cycle of life, beginning with the alchemical blending of dry seed with moisture, temperature, light, and the day-to-day care and feeding that brings a bounty of fresh food to your table.
It may still be dreary outside, but now is the time to start seeds indoors so that they’ll be ready for outdoor planting in early spring. And with seed catalogs now appearing fast and furious, winter is the best time to dream up your edible garden for 2009. If you’re hoping for just a few salad staples, begin with tender, ruffled red and green lettuces, iron-rich spinach, and spicy radishes. More adventurous gardeners with refined palates should try their hand at seductive heirloom varietals: Charentais melons, purple sprouting broccoli, and ‘Brandywine’ tomatoes. But before you start sowing row upon row of fancy tomato cultivars, think about how many plants you can realistically manage in your outdoor garden. (For tips on sizing your garden plot, see our earlier Handbook, Down to Earth.) Your best sources of information and supplies are local seed companies like Territorial Seed Co (territorialseed.com) in Cottage Grove, which offers a wide selection of regionally adapted varieties. By late February, sowing the seeds of your spring and summer vegetable garden can start in earnest. Timing is everything.
{page break}
Basement Ecology
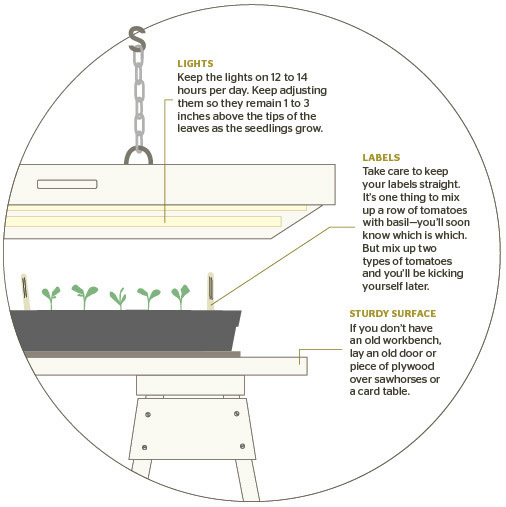
The best place to start seeds is a basement, as you’ll be able to hang the grow lights from floor joists. Wherever you choose to grow your seeds, you’ll need a way to hang lights and ample space for a table large enough to accommodate a few seed flats. Use a combination of ceiling hooks, S-hooks, and a light-duty chain to hang fluorescent shop-light fixtures with wide-spectrum bulbs of 5500 Kelvin or more from your floor joists.
There are several varieties of reusable plastic flats, pots, and trays available at nurseries. Most seedling flats and trays measure about 21 inches by 11 inches. The most foolproof planting method is to place a seed flat with drainage holes within a standard drip tray—the nested tray can easily be removed to drain excess water. Single pots will work, but they require a more labor-intensive draining process.
{page break}
The Nurturing Heat
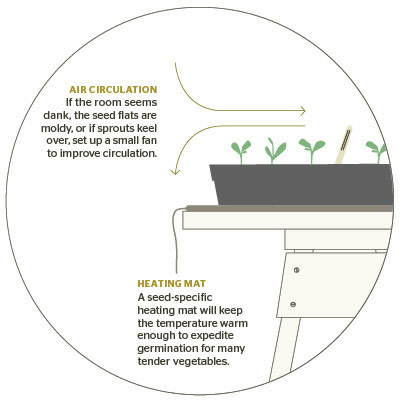
Most seedlings germinate best with bottom heat ranging from 60 to 72 degrees. The best way to get this consistency is to set up a commercial seed-starting heating mat underneath your trays or pots—these keep temperatures about 15 degrees above room temperature. At Portland Nursery (portlandnursery.com), Hydrofarm Seedling Heat Mats sell for about $30 for a single-flat size, $50 for a two-flat size, and $80 for a four-flat size. If you’d prefer to skip this step, choose a nook in your house that will provide a fairly consistent temperature. The top of your refrigerator can be an excellent place to start those flats of seeds that germinate best in warmth.
Inch by Inch, Row by Row
Commercial soil-free seed-starting mix is available at most retail nurseries or in large bags at Portland’s Concentrates Inc (concentratesnw.com). The mix is a bit more spendy than regular potting soil, but it offers better moisture retention and a finer texture. Plus, it’s sterile, so it’s less prone to mold and disease. Moisten your seed-starting mix in a large bowl or bucket and gently scoop the damp soil into your pots or flats to a 2-inch depth, being careful not to compact it too much.
Set up your labels before sowing seeds, and stick rigorously to the procedure to keep track of what you’ve sown. Popsicle sticks will work, or you can purchase wood, metal, or plastic labels. Use a pencil (markers will fade in sunlight) to mark each label with the seed’s complete name and the date it’s sown. Once the labels are in place, sow your seeds according to the depth indicated on the seed packets. It is crucial to start each type at the proper time, so that the plants are neither too large to manage indoors before setting out nor too small to survive outdoors.
{page break}
Tend the Crop
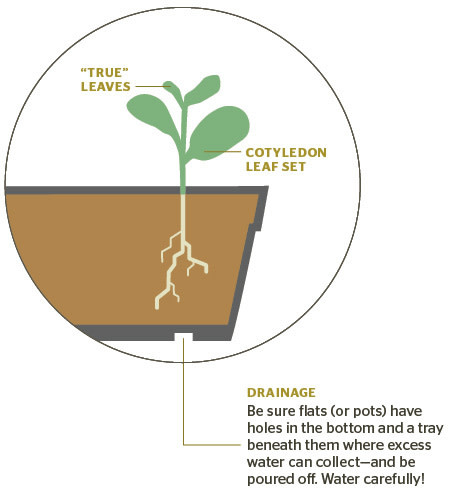
Seeds take anywhere from a few days to a few weeks to germinate. During this period, it is important to keep the soil damp but not soggy. You’ll want to water gently—try a spray bottle or a fine-sprinkling nozzle on a watering can to avoid disturbing the seeds. Make sure the flats are well drained to avoid rotting the seeds or encouraging disease. Check daily to be sure water isn’t standing in the bottom.
When green leaves emerge from the soil, your seeds have germinated: bottom heat is no longer necessary, but light is essential. The lights should always be 1 to 3 inches above the tips of the leaves as they grow, and they should be on for 12 to 14 hours per day. Watch your seedlings closely to make sure they are neither leaning sideways toward the light nor touching the bulbs. Once the seedlings have developed their first set of “true” leaves (a second set of leaves after the cotyledon leaf set—see detail in above diagram), begin fertilizing once a week with a half-strength organic liquid fertilizer.
At some point, your vegetables will outgrow their flats or pots. If temperatures outside have not yet reached the level that the plants need to thrive, you will have to transplant them to a bigger pot. The process is easy but requires a little dexterity: use a fork, chopsticks, or another slender tool to extract each seedling’s roots from the soil without disturbing the fragile stem. Fill the new pot with fresh potting soil and make a hole the size of the root system. Gently transfer the seedling into its new home and delicately tamp fresh soil around it so its roots are firmly planted.
{page break}
Potential Problems
Observe your seedlings carefully as they grow. Watch the leaves to see that they are green and healthy and not too skinny or spindly. Common problems for seedlings are damping-off disease, mold, and insects. Damping-off disease occurs when there is poor air circulation and excessive moisture. If your seedlings topple inexplicably or have brown, shriveled stems, or if mold appears on the soil’s surface, cut back on the water, check that drainage is good, and try using a small fan to improve air circulation. Segregate the flat that seems to have this problem from the healthy seedlings. The best preventive measure for insects like aphids, which can be lethal to seedlings, is to keep all plants that could be harboring eggs or grown insects out of the room where you’re starting seeds.
The process of hand-sowing seeds, tending seedlings, and harvesting your own vegetables is a great way to establish a more meaningful connection to the food you eat. By observing your seedlings and adjusting to local weather cycles and particular plants’ needs, you’ll tune in to timeless seasonal rhythms that have guided human, agricultural, and culinary patterns for millennia. But starting vegetables from seed is also economical, fun, and maybe even an act of flagrant optimism. Who knows? Maybe this year you’ll be able to harvest your first batch of tomatoes in June instead of late July.