Down to Earth
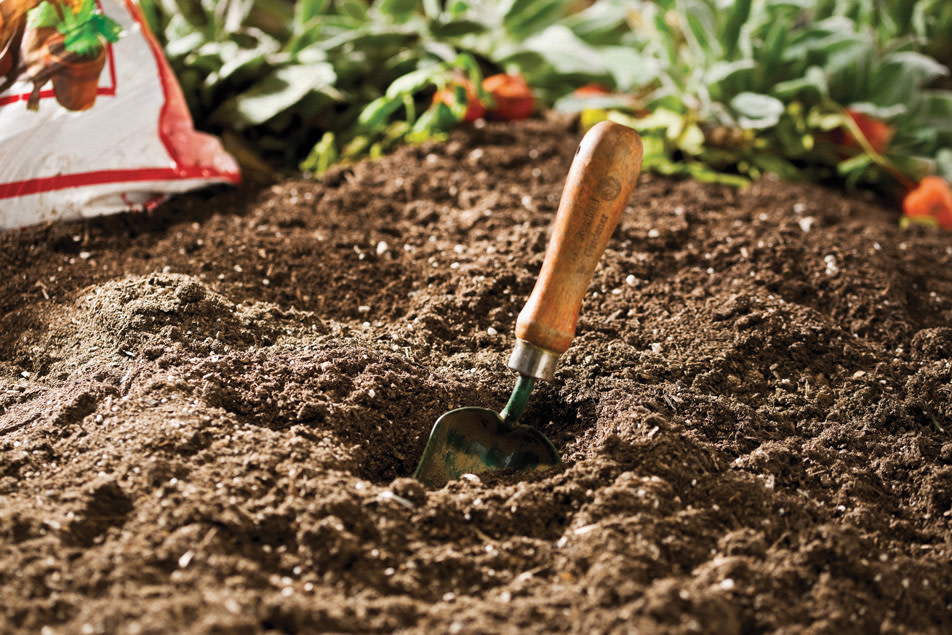
A good first lesson in urban farming is to learn the difference between “dirt” and “soil.” The former is the dead, brown powder contractors dig out from under a house. The latter teems with living organisms that intimately connect with the plants that grow in it.
For all the fame the Willamette Valley enjoys for its rich soil, the average Portland backyard is made up largely of dirt: compacted, stripped and often laden with refuse collected over the decades. Consequently, the second major lesson every urban farmer here needs to learn is how to turn dirt into soil. The months of January and February are the prime time to get started in preparation for spring planting. If you follow these simple steps, you can improve the quality of your soil and produce more nutrient-rich vegetables in the coming season’s crop.
{page break}
Layering can help you create the best growing conditions for your vegetables by keeping grass and weeds out and nutrient-rich compost in.
Know Your Levels
Most vegetables need a slightly more alkaline environment than our native soil to reach their full potential. The soil here tends to be on the acidic side, which is great for growing rhododendrons, primulas and other flowering plants, but it’s not as conducive to growing vegetables. Mixing agricultural limestone (available at nurseries) into your soil will help lower the acidity level, but the exact amount you need to add will depend on your original levels.
To test pH levels, take a sample from the proposed site to a professional lab, like Wy’east Environmental Sciences (2415 SE 11th, 503-231-9320) If you’re planting within three feet of an older home, have them also test lead levels (lead paint was legal before 1978). A low-level lead test costs $20, and pH levels can be tested for $15.
Prep Your Bed
Next up, ready the area to create a bed where vegetables can flourish. Raised beds will help your vegetables thrive, warming the soil earlier in spring and vastly improving its drainage. Root out perennial weeds from your plot, including dandelion and quackgrass, and if the soil is wet and clumpy, toss a tarp over it for a few weeks to help dry it out. Then, rough-chunk your soil into clods with a shovel and turn the clods over, grass-side down.
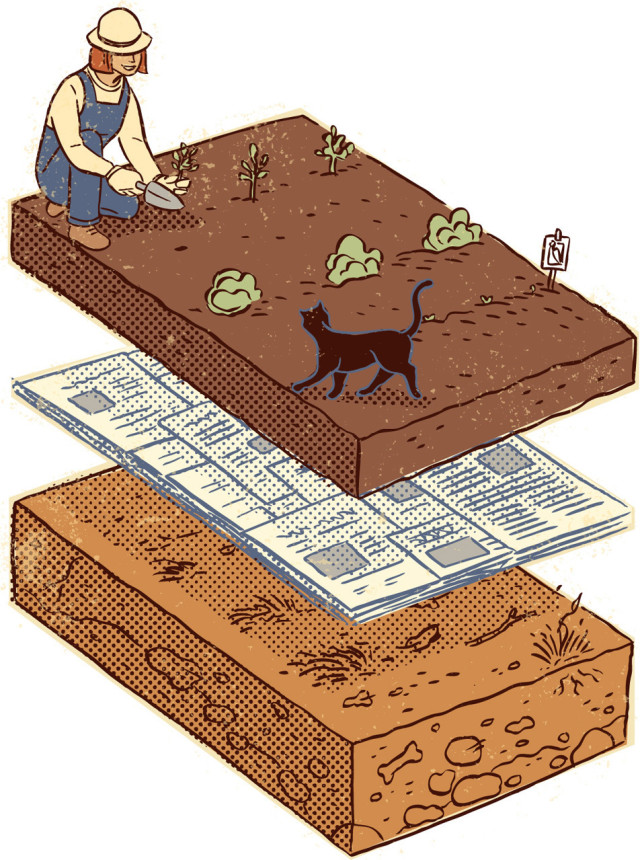
Level the surface by filling in the cracks between clumps. Compost is the best material to use for this. Then spread newspaper (skipping the slick ads) six layers thick over the whole thing, overlapping the sheets substantially so you can be sure to smother any remaining grass and weeds below. Be methodical: There is an art to doing this without leaving gaps.
{page break}
Compost Is Key
Vegetables are heavy nutrient feeders. They need loose, well-aerated soil with good drainage, so the bed will require additional compost on top of the newspaper layer. Mixing in mushroom compost works best. Typically, it already includes lime, which could help solve any existing acidity issues. It also has a finer texture because it’s not solely manure. Additional ingredients, such as decomposed straw, give it a loose feel that allows root crops like carrots, turnips and beets to develop properly.
Mushroom compost is readily available in the spring, but some supply stores will carry it out of season. Aged steer, horse or chicken manure is a fine alternative and is available year-round a most stores. Homemade kitchen or leaf compost also works well, although few households actually produce enough to support their gardens. But save the fibrous, woody stuff like ground bark or wood chips for trees and shrubs, not your vegetable bed. High in lignin, these materials soak up nitrogen as they decompose, leaving your vegetables hungry. Too much nitrogen isn’t desirable, either: It encourages lush growth, which can make plants susceptible to aphids.
Raised beds will help your vegetables thrive, warming the soil earlier in spring and vastly improving its drainage.
You can find good compost at Grimm’s Fuel Company (grimmsfuel.com) and Mt. Scott Fuel Co. (mtscottfuel.com). They both carry mushroom compost all year. Grimm’s sells it in bulk for $36 per yard; Mt. Scott sells it in bulk as well for $29 per yard, or you can bag it yourself for $3.50 per two-cubic-foot bag.
Once you’ve made your compost selection, spread a one- to two-foot layer on top of your prepared bed and let nature take its course. Rain, freezes and the work of worms and microbes will help the material break down. Given a couple of months to mellow, age and settle, the compost should be suitable for planting in spring. Then, seeds can be sown in the top layer of compost above the decomposing newspaper.
By planning ahead for the season and endeavoring to create nutrient-rich soil, you can produce vegetables worthy of the finest plate in town.
{page break}
Plotting Your Garden
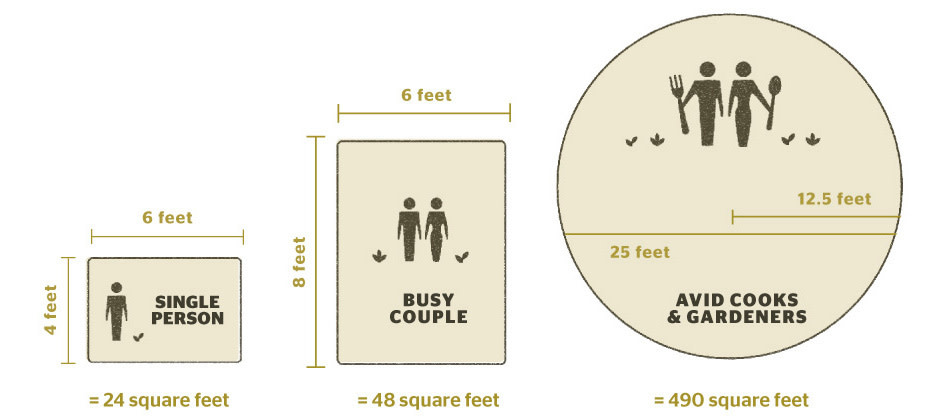
Determining Your Plot Size
If you’re starting a bed from scratch, base the size on available sun and a realistic measure of personal ambition. A 6- by 4-foot plot can grow enough for singles feeding the occasional friend. A busy couple might start out witht 6- by 8-feet, and two avid cooks can go for a 25-foot (490-square-foot) circle.
Determining Square Footage of a Circle If you slept through most of your Geometry 101 class, here’s a refresher on determining the square footage of a circle. Multiply pi (3.14) by the square of the radius (half the diameter) of the circle. For example, if your circle is 10 feet across, the radius is 5 feet. The square of the radius is 25, which you multiply by 3.14 to get 78.5 square feet.
Where to Put Your Plot
You’ll need plenty of sunlight and good drainage to ensure a healthy crop. Track the sun and chart the shadows cast by buildings, fences, trees and hedges at their shortest and longest times of the year. A shade-free, south- or west-facing wall is ideal, but as long as your spot is sunny and sheltered from the wind it should work for your plot.
Hot spots, which get sun from at least May to September, are best for warm-season crops like tomatoes, peppers, basil and eggplant, as well as overwintering crops like cabbage, broccoli, mustard and fava beans. If a section of your space is not ideal, try growing parsley there. It will do just fine in a partially shaded corner, even in summer.
Go Make Your Bed
Orderly types who want to keep grass out can build wood or stone sides for their raised beds. If you’re sure of the location and size of your plot, consider a traditional edging like dwarf boxwood or myrtle. Or you can always go hillbilly-style and just hoe up the dirt edges and flatten the top.