How to Plant a Tree
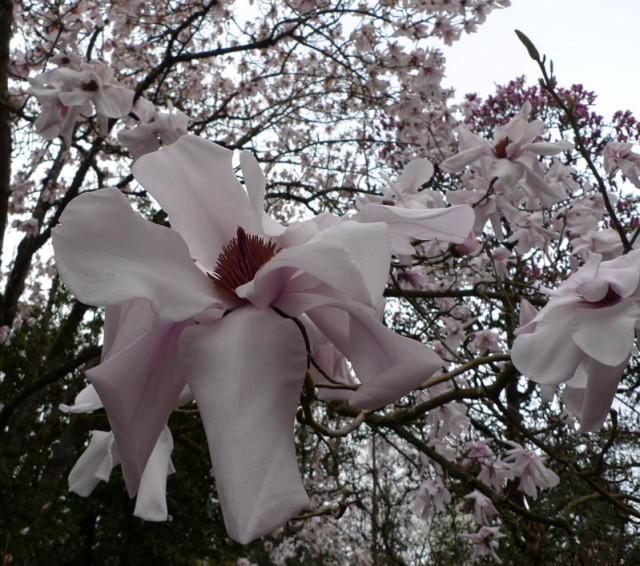
Here’s a great reason to plant a tree – Magnolia sargentiana. Consider yourself lucky if you have the room to plant one.
Ever wondered about the proper – yes, really proper – way to plant a tree?
Well, let me tell you! Having seen the breadth of mistakes that can be made, I’m a little opinionated about how to do it. But it’s all for a good cause: trees that aren’t planted at the correct depth or that haven’t been properly root-pruned at planting can suffer and even fail later in life. Not that it’s difficult to plant a tree properly – just follow a few simple instructions and you’ll be tree-planting right along with the best of ’em.
Trees are typically sold in one of three ways: bare-root, balled and burlapped (B&B) or containerized.
Bare-root trees are the easiest to plant, lightest to transport – and the least expensive, since they take up little space and require no labor (like potting up) at the retail end. Fruit trees are often sold bare-root in late winter and earliest spring (right now), although some shade trees are sold bare-root, too. But the bare-root season is brief – just while trees are dormant. Once spring arrives and they begin to grow, they must be potted up and at that point, the price usually increases.
Keep bare-root tree roots consistently damp and cool until planting time. To plant, disentangle the roots and dig a hole about the size of the roots. Friends of Trees then suggests you set a "small mound of soil at the base of the hole, place the roots on the mound, and gently add soil back into the hole, avoiding air pockets and [avoiding] compacting the soil." I haven’t tried the mound method but it seems smart. I just keep the roots spread out with one hand and pour soil around the roots with the other. Either way. Just be sure to water deeply after planting to settle and dampen soil.
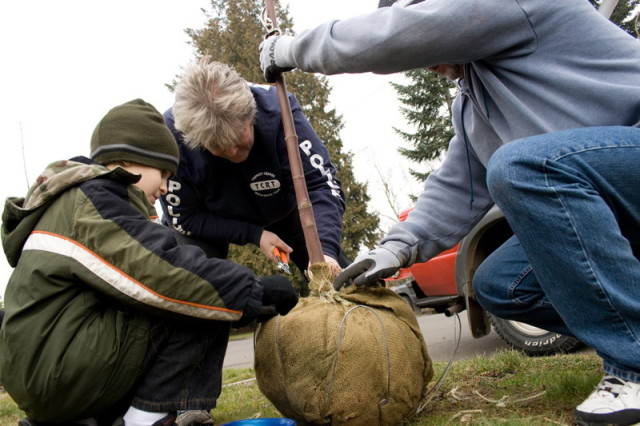
A classic B&B (balled and burlapped) rootball, wrapped with burlap and string and the metal cage. Photo courtesy of Shasta Lin and Friends of Trees
Starting with a balled and burlapped (B&B) tree?
B&B trees are grown in the field instead of being planted in pots. Before they are sold, they are dug and the roots are wrapped in burlap. In days of yore, nurseries recommended planting the whole burlap root ball in the ground in order to prevent root disturbance. This led to problems when the burlap failed to decompose properly and constricted root growth, or when people failed to untie the burlap from the trunk. Problems were compounded when plastic fibers were incorporated into burlap and string, leading to root or trunk strangulation and premature tree death years after planting. Today, it is recommended that burlap wrap (and certainly plastic "burlap") be gently removed, either by cutting it away with scissors or by untying it and slipping it gently out from underneath. Some B&B trees are transported in a wire "cage," which should always be removed. Be gentle with a B&B tree to avoid cracking the root ball and damaging roots.
To plant, dig a hole twice the width and the same depth as the ball of roots. If possible, position the tree, then remove burlap or wire. Center the tree, filling in with soil to stabilize. I like to use a yard stick like a level across the planting area to ensure that the tree isn’t planted to deeply (see diagram). Once the tree’s depth is correct, add the rest of the soil to level, gently using your fingers (not feet) to press out air pockets. In addition to giving the tree a needed drink, a deep watering helps settle the soil so you know where to add more soil.
If your tree comes in a pot, it is considered a containerized tree. Egads, "potted" almost sounds better. Unless you’re British.
Containerized trees are great for nurseries because they can be kept healthy in pots for months or sometimes a year or more. The drawback is that while the tops are growing merrily, the roots can begin circling round inside the confines of the pot. Circling roots can be a real problem for a tree later in life if they are not handled carefully at planting time. Here’s what to do:
Dig a hole as deep as the container but twice as wide. Remove the container and massage, tease apart or poke at the roots to loosen them from the soil. If any roots are circling and cannot be teased out easily, cut the circling roots with a garden knife or sharp clippers. Sometimes it helps to place the unpotted root mass in a large bucket of water for a half hour or so to wash away some of the soil and make teasing out roots easier. Place the tree roots gently in the hole and back fill. Avoid air pockets and soil compaction by using your hands to gently press soil into place and water roots deeply after planting.
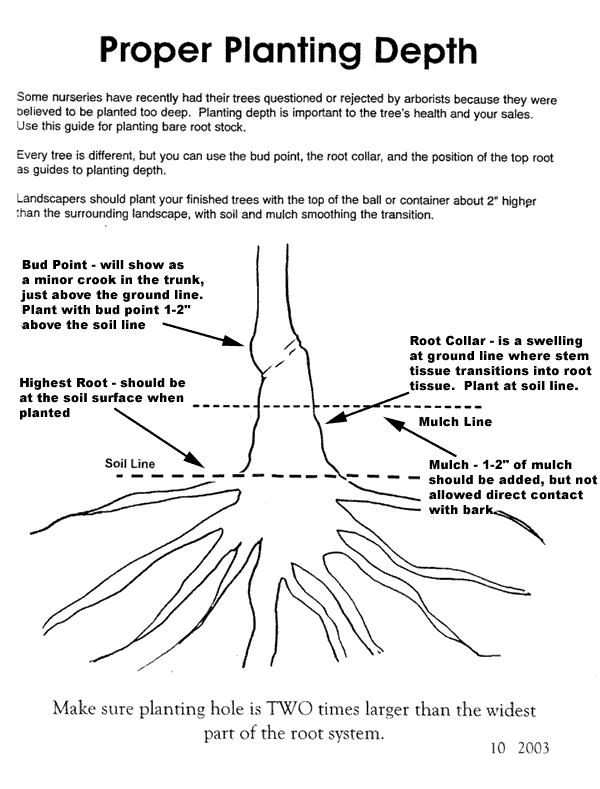
Image courtesy of Friends of Trees
Tree-Planting Tips:
RIGHT TREE, RIGHT PLACE:
Select a tree that is suitable to the light, moisture and soil conditions on offer. If your soil is poor or doesn’t drain well, select a tree that will tolerate those conditions.
HOW TO DIG A HOLE:
When digging a planting hole, chunk up the sides of the hole with your spade so it doesn’t become a smooth, slick-sided "tree grave". If the surrounding ground has been trampled flat and is slick and compacted (common when planting during wet weather), rough compacted soil up with a shovel after planting. Better still, when the ground is really sodden, keep footprints to a minimum.
TO AMEND OR NOT TO AMEND SOIL?:
Soil amending (adding compost) is much-debated but, when planting a tree, the native soil is best to help anchor the tree, retain moisture and prevent sinking. Friends of Trees does not use soil amendments when planting.
Having said that, I often spade compost into the margins of the root zone/planting area around the tree to encourage soil biota and worms, particularly if the soil is compacted or poor. Avoid adding compost underneath the tree roots, as it can cause the tree to sink as it decomposes.
If you do add compost to the surrounding soil, avoid manure – instead add finely-ground, decomposed woody material or a blended material primarily consisting of woody material.
MULCHING:
When you’ve finished planting, add a surface mulch to retain soil moisture, minimize weeds and keep the trunk safe from overenthusiastic lawnmower operators. Spread mulch around the newly planted tree – a minimum of 2 feet wide for the smallest tree and up to 4-6 feet across for larger trees. Young trees grow much better and faster without root competition, even from grass. Spread 2-4 inches of mulch over the root zones, keeping mulch 1-2 inches away from the actual trunk.
For more great information on tree-planting and to learn about volunteering locally, see the Friends of Trees website. Some quick links: for information on tree placement, click here; and click here for more information about why it’s good to plant trees.