Between the Sheets
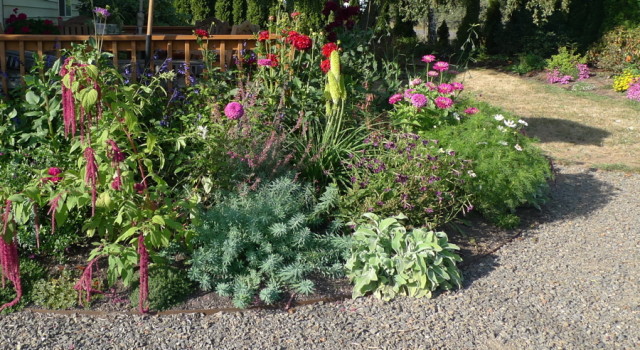
This lush garden was sheet mulched this past winter and planted in April and May.
Sheet mulching – also known in Permaculture as "composting in place" – is one of the best ways to create a new garden by eradicating weeds and building soil fertility without herbicides or tilling, both of which damage soil ecology. At its simplest, it’s a two-step process in which a layer of cardboard or up to a half inch of newspaper is laid over grass or weeds, and then the whole shebang is covered with about 12 inches of organic compost or mulch and given time to break down.
Autumn is the perfect time to begin, as you can set it up and forget about it for six months, while the rains keep it damp, smother the weeds below the paper, and aid in the decomposition of the compost on top. October is also perfect because the ground is not as saturated as it will be in December of January. You still need to be careful about walking on it and compacting it, but you’re less likely to damage garden soil by walking on it at this time of the year than in winter, when it’s completely soaked.
Sheet mulching is sometimes called the "lazy person’s" way to create a garden bed. And it’s true – it’s easy, when all you do is spread newspaper and throw compost on top. And when your soil is basically decent, and you’re just planting vegetables, that can often work fine. But with a little elbow grease at the front end, you can speed up the soil improvement process and customize your soil for the particular plants you plan to grow.
For seasonal vegetables and flowers, the simple two-step method is fine. Decide on the outline you want (use a garden hose to outline a curvy garden shape, or – if you want to be symmetrical – measure with a stake and string to create a square, circle or oval). First, water the ground well. Then, cover the grass or ground with cardboard or up to 1/2 an inch of newspaper, making sure to overlap the edges to avoid gaps. On top of the cardboard or paper, spread about 12 inches of organic matter. See Gaia’s Garden by Toby Hemenway for an abundance of ideas for materials, soil amendments and mineral and fertilizers that can be used to enrich the soil during the composting process. This process is quick and easy on the front end, but it can take a few years for the existing soil and the new compost to integrate. And it’s important that the soil not be too compacted when you lay down the paper. If it is, it really is best to rough it up with a spade.
Another approach, used by garden designer, horticulturalist and plant explorer Sean Hogan, owner of Cistus Design Nursery, requires a bit more front-end work but ultimately creates more beautiful soil more quickly. Sean calls it his "modified English double-dig" method:
-First, weed the area, particularly focusing on perennial weeds. Starting at the center of the bed, chunk the soil roughly like a farm field. Every once in a while, toss clods towards the center so the center is a little higher than the edges. When you’re done, you want a slight depression around the edges, and a humpy, hummocky look. Add 3-4 inches of whatever soil amendment you’re using. Chop it in, "lazily," as he says, to roughly level it. Add another 3-4 inches of your new mix over the top and plant. Sean doesn’t use cardboard or newspaper, as he says these create an anaerobic (no oxygen) environment.
Personally, I mix and match methods, depending on the existing soil conditions and the plants that are going in. For instance, I use 4-8 layers of newspaper when dealing with more pernicious grasses or dandelions (morning glory and blackberry have to be completely removed beforehand – no amount of cardboard will kill them), figuring that it’s okay for it to be anaerobic for the first few months while killing the perennial weeds… but I do always chunk up the ground beneath and chop in about 1/3 of the soil amendment into the chunked-up soil underneath the newspaper/cardboard layer before adding another 4-6 inches on top.
Chunking the soil is important to help blend the two layers, avoiding the problem of plants only rooting into the light, fluffy soil on top – a particularly bad problem in areas of town with a very heavy, compacted soil profile. I’ve often heard it said that "earthworms and soil biota will integrate the two layers" but in my experience, this doesn’t happen fast enough – it’s best to do it by hand in the beginning and then not worry about having to blend the layers later.
So how to choose the compost?
When planting annual vegetables or flowers, I usually use a composted manure compost like washed Tillamook cow manure or mushroom compost.
When planting mixed beds of shrubs and perennials, I pick a soil blend incorporating both manure and wood-based compost.
When planting woodland or forest margin plants (for example, hydrangeas, witch hazels, viburnums, or herbaceous perennials from an understory woodland environment), I look for compost made up primarily of ground wood or bark. It’s okay if there’s manure in it but the woody material is recommended for the trees and shrubs.
Finally, when planting drought-tolerant Mediterranean or California herbs and shrubs like Cistus, Ceanothus, thyme, rosemary, or lavender, or any plants that thrive in poor, well-drained soill, I select a gritty, well-draining soil blend with liberal amounts of pumice added.
Soil and Compost Sources:
Pro-Gro Mixes
McFarlane’s
Mt. Scott Fuel
Grimm’s
Wood Waste Management
Nature’s Needs