For the Birds

Much as we humans can be picky about the spaces we inhabit, so too are the 200 species of birds who call Portland home—or just drop in from the Pacific Flyway for a quick roost and refuel on their way to the abundant steppes of Patagonia. In the past century, as the Willamette Valley has been systematically developed and deforested, the places birds call “home”—natural “nesting cavities” like decaying trees and wooden fence posts—have become an increasingly narrow and competitive market for local birds. In the 1940s, a longtime favorite—the dainty and warbling Western Bluebird—was forced out of the valley and into higher elevations in search of nesting sites. With the help of local advocates like the Prescott Bluebird Recovery Project, though, Western Bluebirds are slowly trickling back into the fringes of our city. All it takes is some simple, small-scale homebuilding on some good land to lure these winged house hunters back into Portland’s backyards.
You’ll need:
- One standard 4-foot-long 1-by-6 board
- One standard 10 ½-inch-long 1-by-10 board
- About 20 1 ¾-inch galvanized nails (or screws)
- Hammer
- Handsaw (or circular saw)
- Power drill
- 1 ½-inch spade bit
- Some patience
- A good eye for the right location to hang your new bluebird home
{page break}
Gather the Wood
The best wood to use for your birdhouse is cedar or redwood, because both stand up to Portland’s weather quite well, even when left natural. Plywood or oak will also work, but may not be as long-lasting and weather-resistant. You’ll only need to buy two boards: a four-foot-long one-by-six and a 10 ½-foot-long one-by-10. You can cut each of the pieces you need from these two pieces of lumber. Avoid any pressure treated woods because of the toxic compounds they contain, which can be harmful to birds. You can find pre-cut boards of the right dimensions at Home Depot (multiple locations, homedepot.com) or Lowe’s (multiple locations, lowes.com), but for a birdhouse with a little more character, take some time to scavenge around local reuse warehouses like the ReBuilding Center (3625 N Mississippi Ave, rebuildingcenter.org) for recycled boards or panels. If you do opt for pre-painted boards, make sure one side is left natural—the inside of your birdhouse should not be painted. The ReBuilding Center also periodically offers birdhouse building workshops, so check their website often for the latest schedule.
Make your Cuts
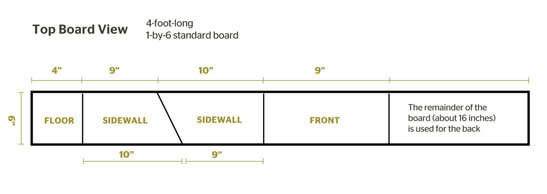
Your 4-foot-long board will become the walls and floor of your birdhouse. Remembering the wise old adage, “Measure twice, cut once,” it’s a good idea to trace each cut before you make it, being as methodical as you can.
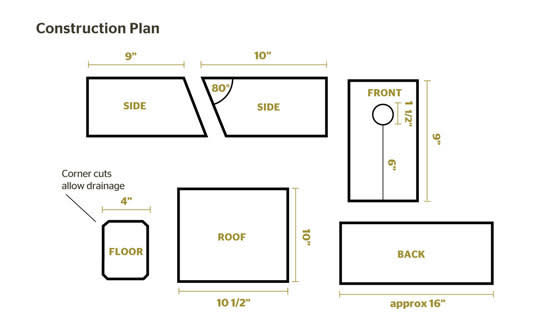
Start with the four-inch floor piece and work your way through cuts for the walls and, finally, the back slab (the least critical dimension), remeasuring after each cut and labeling your pieces as you go. For the floor, simply measure four inches from the end of the board and cut straight across. Then make a small diagonal cut at each corner of the floor piece (basically cutting the corners off) for easy drainage and ventilation.
For the walls, you’ll want to measure two different lengths from the freshly cut end: 10 inches on the left and 9 inches on the right. Draw a diagonal line connecting the two points and make the cut. This will give you two sloped sidewalls.
The next piece will become your birdhouse’s front face. It’s a good idea to drill your entry hole before you make the cut, using the remainder of the board as leverage on a table. This entry hole will be critical to the success of your birdhouse; its relatively small 1 ½-inch diameter precludes the entrance of the Western Bluebird’s most feared predator: the European Starling. Both European Starlings and House Sparrows, introduced from England in the ‘40s, compete with bluebirds for nesting sites—the Starlings can be eliminated with the small entry hole. So to protect your timid bluebirds, it is very important to use a 1 ½-inch spade bit in your drill for the entry hole, which should be about six inches from the bottom of your birdhouse’s façade.
The remainder of the board four-foot board will become the back of your birdhouse. Keep in mind that allowing the back to extend both above and below the main box body will make mounting your birdhouse very simple.
If you buy a board for the roof that is exactly 10 ½-inches long, you won’t have to make any cuts.
{page break}
Drive the Nails
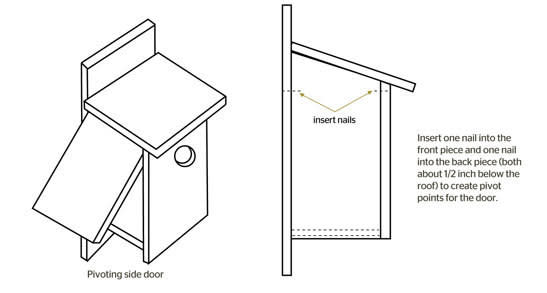
Assemble your walls and front/back pieces in the shape of the house so you can begin attaching them to each other. Before you start nailing away, isolate one sidewall that will become a pivoting doorway. This will allow you to clean out and monitor the nest box. Through this side, you drive only two nails: one each at the top of the front and back pieces. That way, the side door will be anchored at the top so that it can pivot with a little muscle, but you won’t find it swinging in the wind.
Continue nailing from the front and back pieces through the opposite non-pivoting sidewall, leaving gaps of about three inches between each nail. Next, wedge the bottom piece into place and nail from the three non-pivoting sides. Once you have a sturdy, topless birdhouse, use your handsaw to angle the top of the front board to match the downward slope of the two sides. Also, to provide adequate cross ventilation in the box, drill a few small holes near the tops of the two sidewalls. Finally, nail your larger roof board on top (again, skipping the pivoting side), keeping it flush with the birdhouse’s back side and overhanging on the other sides to keep the cavity dry during wet weather.
{page break}
Pick Your Perch
Western bluebirds are fairly picky about the locations of their homes. They enjoy open spaces with plenty of perch sites like fences, wires, or tree branches as well short grass that makes it easy to catch insects on the ground. A spacious backyard with mowed grass or sparse ground cover and scattered trees would provide an ideal habitat, but avoid more heavily wooded areas: They are the domain of the House Wren, which is another big competitor.
Mounting the birdhouse house about five feet above the ground on a free-standing wooden post or pipe works best—any smooth, round scrap pipe or metal electrical conduit will do, especially if you coat it with wax or grease to keep predators away. Fence lines can make birdhouses vulnerable to roving raccoons, so try to avoid these types of thoroughfares.
Make it a Home
Feel free to embellish your birdhouse however you like it—it’s as much a decorative flourish in your backyard as it is a potential home for birds. Hand painting or staining your box can make for a really nice accent. Most paint or stain will be ok: they are generally not toxic to birds. But be careful to avoid dark colors, especially in summer months when a box could overheat. If you do choose to paint or stain, however, leave the inner walls natural. Get creative; transform your traditional birdhouse into a rustic minimalist haven or an avian palace. And most importantly, don’t be discouraged if your birdhouse isn’t immediately inhabited. Give it some time. Even if bluebirds don’t arrive in hordes, other native cavity-nesters like Tree Swallows, Violet-green Swallows or Black-capped Chickadees may also be looking for a place to call home, and may very well find it in your backyard.