A Moveable Feast
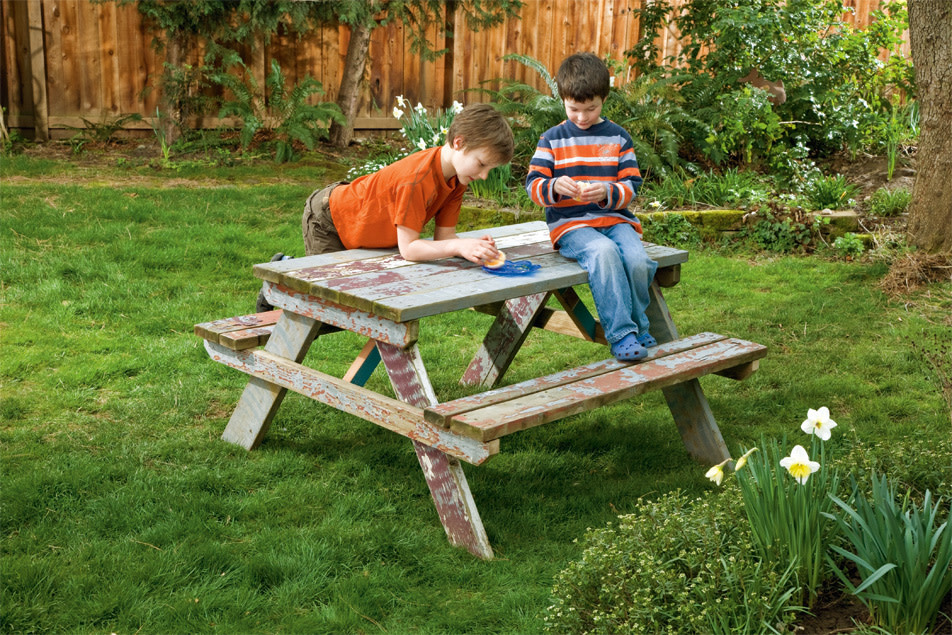
When summer rolls into town and our rain-drenched valley is finally bathed in sunshine for a transient cluster of months, Portland comes out to play. Parks become living rooms; streets become sporting venues; porches become stages; and, most important, backyards become dining rooms. And the staple of any fully functioning backyard dining area is, of course, the Portland picnic table, whose classically unadorned social space lends an inviting air to our lawns, encouraging community, conviviality, and the leisurely embrace of the season.
Outdoor dining choices abound. On the high end, there are the elegant, teak-slatted tables that go for up to $3,000 at Design Within Reach; on the sustainable front, Minnesota-based Loll Designs approximates the classic picnic table with a contemporary, high-density polyethylene and Richlite structure. But for as little as $50 in wood and hardware, you can build your own quintessential, rough-hewn picnic table that will truly stand up to the test of time. Just pick an afternoon, roll up your sleeves, and get to work.
We chose a homegrown design courtesy of John Wenderoth, a local contractor, ReBuilding Center volunteer, and all-around handy guy who’s built everything from hot tubs to pizza ovens. And because it continues to be a hotly debated issue, we should warn you in advance: This design is for a table with attached benches.
{page break}
Open Space
The first step is to carefully collect the wood for your picnic table (see “Gathering Wood” below). Once you have amassed your pile of wane-free, handpicked lumber, it’s time to clear a solid, flat workspace for yourself. If you don’t have a sturdy worktable, a flat driveway or patio will work well for this project. Try to avoid working directly on your lawn or other uneven surfaces.
Materials:
• Four 10-foot 2 × 6 boards
• Three 10-foot 2 × 4 boards
• One 12-foot 2 × 6 board
• One box of 2 ½-inch decking screws
• Handsaw (or circular saw)
• Power drill (with a driver bit to match decking screw heads)
• Speed square (a protractor will work, but this is a great tool to have around)
• Tape measure
• A level
Gathering Wood:
John Wenderoth advises that you select straight boards free of wanes, knots, and end checks (splits that start on the ends). Here are his top picks for Portland planks:
• ReBuilding Center Scour the salvage yard for wood with character. Avoid older pressure-treated lumber, which may contain unsavory chemicals.
www.rebuildingcenter.org
• PARR Lumber Gather FSC-certified (Forest Stewardship Council) Douglas fir or tight-knot cedar planks. Cedar is naturally rot-resistant, but it’s also a bit of a splurge.
www.parr.com
• Lowe’s or Home Depot These will be the cheapest, but the timber is not managed with the care of FSC practices. Here, opt for kiln-dried Douglas fir or cedar.
www.lowes.com, www.homedepot.com
{page break}
The Portland Picnic Table
It’s best to construct your table in these four phases, beginning with the tabletop. When you’ve finished step 4, don’t forget to sit down, take a load off, and enjoy your handmade masterpiece.
Chop It Up
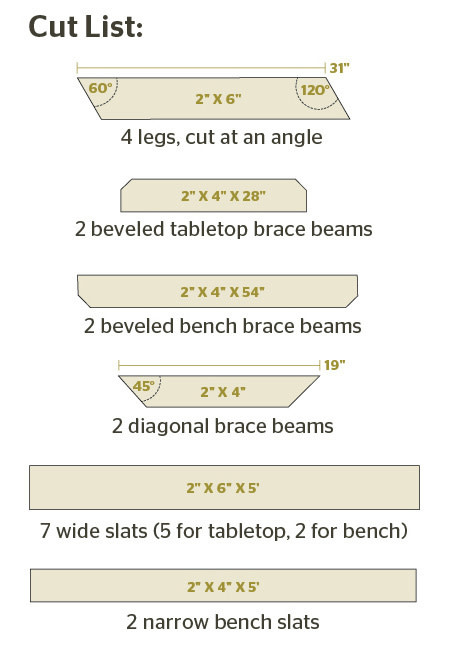
Now it’s time to make your cuts and label the planks of wood that will soon become your picnic table. As you plunge into the saw work, remember (as always) the wise old adage “Measure twice, cut once.” It’s a good idea to scribe each cut—even the simple ones—with a pencil before you make it. Be as methodical and precise as you can: Any slight miscuts can result in a lamentably wobbly picnic table. Refer to the cut list (previous page) for the dimensions and angles of each piece.
As you plunge into the saw work, remember (as always) the wise old adage “Measure twice, cut once.”
1) Start by bisecting your four 10-foot 2-by-6 boards to make your seven wide slats.
2) Next, bisect one of your 10-foot 2-by-4 boards to make the two narrower bench slats.
3) Cut two 54-inch bench brace beams from one 10-foot 2-by-4 board (you’ll have a little scrap left over).
4) The remaining 10-foot 2-by-4 board will become two tabletop brace beams and two diagonal brace beams. (Use your speed square to measure and cut the 45-degree angles on the diagonal to create their trapezoidal shapes.)
5) Finally, transform your 12-foot board into four parallelogram-shaped legs. Trace out these angles on the board with your speed square before executing your cuts, making sure every piece has identical lengths and angles. When you’re done with the cut list, it’s time to finish the pieces with a stain or deck oil (see “Finish Line,” at right, for tips).
{page break}
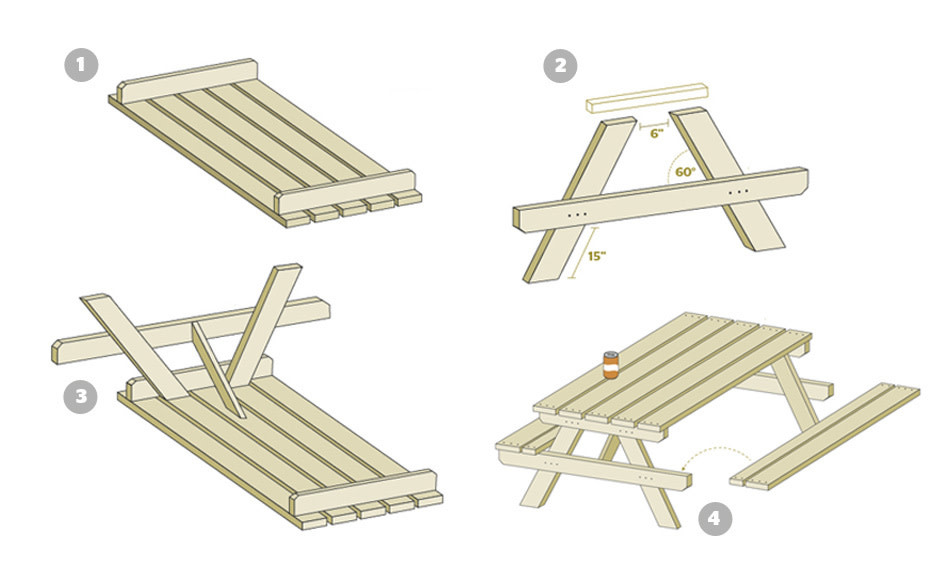
1. Set the Tabletop
Construct your table in four phases, beginning with the tabletop. Lay the five wide slats on top of the two tabletop brace beams (see step 1 above) on your flat work surface, leaving about a screw’s-width gap between each slat to allow for drainage. The brace beams should be positioned one and a half inches from the ends of the slats on both sides, but flush to the long sides of the slats. Use your speed square to ensure that each slat is perfectly perpendicular to the brace beams before attaching. Screw the slats to the brace beams one at a time, using three screws on each end of the slat. Place the outer screws one inch from the edges of each slat, and also place one screw directly in the middle of each slat (see step 4 on next page).
2. Give It Legs
Next, you’ll construct your table’s two identical leg structures.
1) Start by laying two legs on your work surface, slanting upward toward one another in an “A” shape. Leave a six-inch gap between the inner edges of the tops of the two legs so that they will align with the tabletop’s slats.
2) Mark a spot 15 inches from the bottom of each leg on its inner edge and lay the bench brace beam across the two legs at that spot, beveled corners facing down (see step 2 above).
3) Make sure that the brace beam is centered on the legs, and use your speed square to ensure that the brace beam is level—it should create angles on the legs equal to those at the ends of the legs (60 degrees and 120 degrees).
4) Drill three screws through the brace beam into each of the two legs. Repeat the process for the opposite set of legs, maintaining an acute level of precision—two identical leg sets are the most important factors for a wobble-free picnic.
{page break}
3. Lock It In
You’ve got your tabletop and leg sets; now it’s time to lock them in and create a freestanding structure. With your tabletop upside down and flat against your work surface, place your leg structure upside down inside of the tabletop brace beam, aligned with the two next-to-center tabletop slats. Drill three screws inward from the outer surface of the tabletop brace beam, keeping the legs as perpendicular as you can. Repeat on the opposite end for the second leg structure. The most important structural elements of this table are the diagonal brace beams (see step 3 on the previous page) that run between the tabletop and the bench brace beams on either side. They pull the structure together and secure the lasting perpendicularity of the legs to the tabletop. Align each of the beams between the middle of the center tabletop slat and the middle of the bench brace beam, drilling two screws at each attachment, perpendicular to the diagonal beam’s 19-inch side.
4. A Place to Sit
Now that you have your basic structure, turn it onto its feet and lay your bench slats. Each bench will consist of a narrow and a wide slat, with the wide slat on the outside, flush with the outer edge of the bench brace beam. There should be a small gap between the inner slat and the table’s legs on both ends.
The final step? Have a seat, crack a beer, and prepare to regale backyard dining guests with the story of one lazy afternoon when you built this charming, rugged dining space with your bare hands.